
Operate your widget
Set up your tours
Prepare content, ticket categories, ages, schedules, prices and policies.
Shareable guide · no sign-in required ↗Open Tour Setup, create a tour, and save a booking option and departure schedule. You can preview immediately and return to the completion notices later. A new tour begins as a private draft.
Content travelers can understand #
Add the information a traveler needs to choose and find the tour:
- Public title, short summary, and full description
- Category, duration, and supported languages
- Highlights and itinerary
- What is included and not included
- Requirements and what to bring
- Meeting point, instructions, and end point
- Accessibility and age restrictions
- Confirmation and contact information
The full description and meeting point are required before public bookings, but do not block sample-page preview. A short summary is strongly recommended because it makes the tour card easier to scan.
Gallery and cover image #
Upload at least one ready image and choose a cover. Add useful alternative text, such as “Guide addressing guests beside the London Monument,” rather than “tour image.”
Booking options and traveler categories #
A Booking Option is a version that can be booked independently, such as Private group, Shared group, With lunch, or E-bike. Each option has its own booking mode, duration, capacity, schedule, and prices. Put another language on the departure schedule; do not make a new option only for a language.
Adult is commonly required and starts at 1. Child, Infant, and Senior normally remain optional with a minimum of 0. If the Widget says a child or infant is required, clear Required on that category, set its minimum to 0, and save your changes.
Paid options can also offer optional extras priced per booking or per participant.
To label age groups, open Tour Setup → your tour → Booking options → Ticket categories. Enter the category name and use Eligibility guidance for the age range shown below it in the widget. For example: Adult with “Ages 12+”, Child with “Ages 6–11”, and Infant with “Under 6”. Set the ages to match your own tour; these are examples, not fixed defaults.

Traveler policies #
Add at least one cancellation rule. Each rule defines its cutoff, whether cancellation is allowed or reviewed, the refund result, and the explanation shown to the traveler. You can also configure rescheduling, no-show, late-arrival, weather, minimum-attendance, and operator-cancellation terms.
Save the policy, then select Preview terms to freeze the wording used for publication. This does not publish the whole tour.
Seasons, departures, and availability #
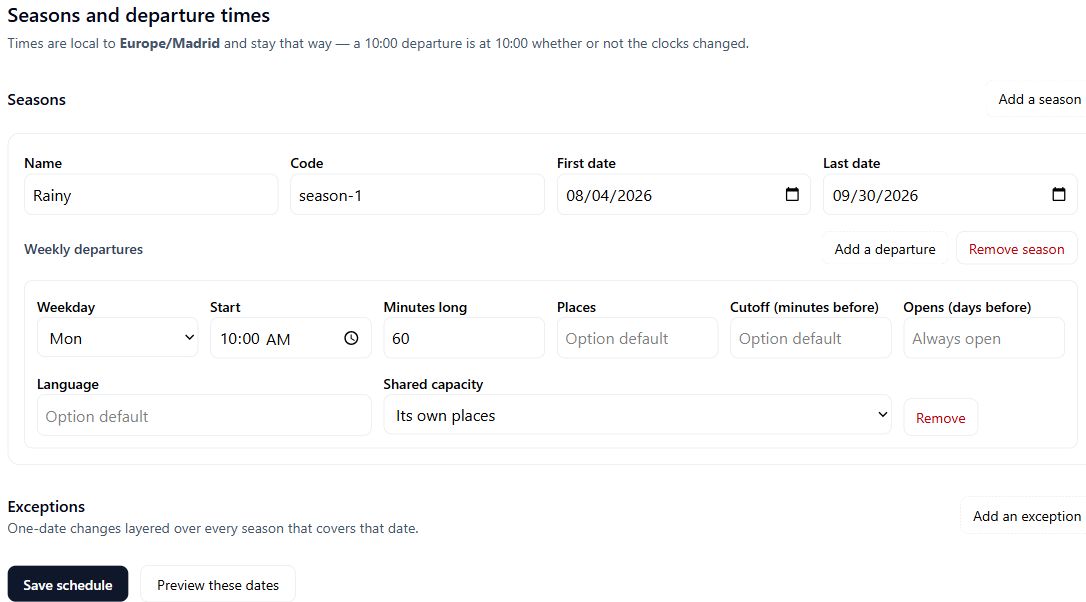
Manage schedules in Tour Setup → your tour → Dates & prices. The widget displays the resulting availability; customers do not edit your schedule from your website.
Create a season with a first and last date, then add weekly departures. Set the weekday, local start time, duration, places, booking cutoff, sales-open window, language, and shared capacity where needed.
Use one-date exceptions to close, move, add, or replace a departure. Preview the schedule and resolve duplicate-time or daylight-saving warnings. The booking horizon controls how far into the future dates appear.
Prices, taxes, fees, and promotions #
For paid options, create rate periods that cover the departure dates and set a price for every ticket category you sell. A rate can be limited to selected weekdays.
- Already in the price discloses a tax or fee without increasing the displayed price.
- Added to the total calculates and shows it before payment.
- Promotion codes can be fixed or percentage discounts with dates, use limits, and option scope.
The Widget shows the adult price at traveler selection and the complete total in checkout. Save your changes after changing a price. Quick preview does not calculate a final paid quote.
Preview now, enable bookings when ready #
- Save your tour, options, and schedule, then select Preview widget.
- Explore the sample page without completing every checklist item. Notices remain available to help you finish.
- Before accepting customers, resolve the blocking items in the tour's Online booking tab.
- If your widget is not enabled yet, open Widget settings and select Enable online booking. This enables the widget and publishes tours that are ready. If your widget is already enabled, select Enable online booking in this tour's Online booking tab to publish this tour.
After a tour is enabled, saved updates apply to future bookings. Existing bookings keep their original prices and accepted terms.