
Install and customize
Install your widget
Add the snippet, choose a display mode and connect your Book now button.
Shareable guide · no sign-in required ↗Before you start: have access to your website’s HTML or custom-code editor. Use your own code from Widget settings.
Widget settings gives you both options under Ways to sell. They use the same tours, availability, prices, and booking journey.
Direct booking link #
Use it in social profiles, messages, email, QR codes, directories, or websites where you cannot add JavaScript.
Website embed #
Contact us to connect the widget to your website. Copy the generated snippet into an HTML or custom-code block on your website.
Standard embed #
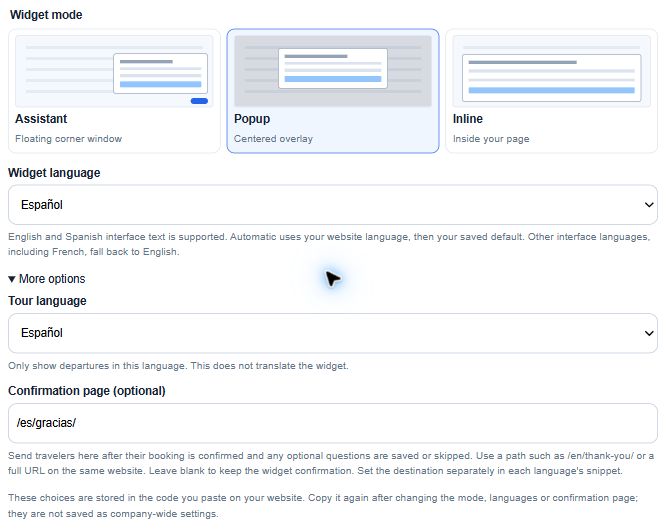
In Widget settings → Website installation, choose the mode and widget language. Open More options to choose a tour language, floating button or confirmation page, then select Copy code. Paste the snippet once per page in a block that allows HTML and JavaScript.
These choices are stored in your website's snippet. Copy and replace it after changing them; they are not saved as company-wide settings. Saved appearance changes apply automatically. Your generated code follows this structure:
<div id="tourdash-booking"></div>
<script
  src="https://www.tourdash.app/widget.js"
  data-company="wc_your_public_widget_key"
  data-target="tourdash-booking"
  data-mode="assistant"
  data-show-launcher="true"
  data-locale="en"
  data-success-url=""
  data-theme="auto"
  data-version="1"
  defer></script>
Do not replace the public widget key with a company name or internal ID. The Widget requires JavaScript, HTTPS, iframe messaging, and at least 320 CSS pixels of width.
Choose how it opens #
To use your own Book now button, choose popup or assistant and put the
button before the script on the same page. In assistant mode, set data-show-launcher="false" to hide the built-in floating button. Mark your button like
this:
<button type="button" data-tourdash-open>Book now</button>The loader connects the first button or link marked data-tourdash-open. data-show-launcher only applies to assistant mode. Use popup to give the widget a centered
overlay on mobile and desktop; check it on both screen sizes after installation.
Open with a tour already selected #
Add a published public product identifier to start at the date step. Add a date to continue at departure selection. TourDash still validates current availability and price.
data-product="public-tour-identifier"
data-date="2026-10-01"
For a direct link, use the same values as query parameters:
https://www.tourdash.app/booking/YOUR_WIDGET_KEY?product=PUBLIC_PRODUCT_ID
https://www.tourdash.app/booking/YOUR_WIDGET_KEY?product=PUBLIC_PRODUCT_ID&date=2026-10-01
An integration can also use data-option for a specific Booking Option. Use the
option's stable code, such as default only if that is its actual code, together
with data-product. Do not use a numeric ID or display name.
Check your result: open the installed page on mobile and desktop. Your Book now button should open the selected mode. Check each language and tour-specific page.
Next: set your languages or set a confirmation page.